Week 7
Lets Build a Kite!
This week we will make our own kites at home. Follow the instructions below or be creative and make your own kite. Be sure to share your kites on our FB page with the hashtag #PVEGoesFlying or #PVESTEAM. Have fun and happy kite flying!!
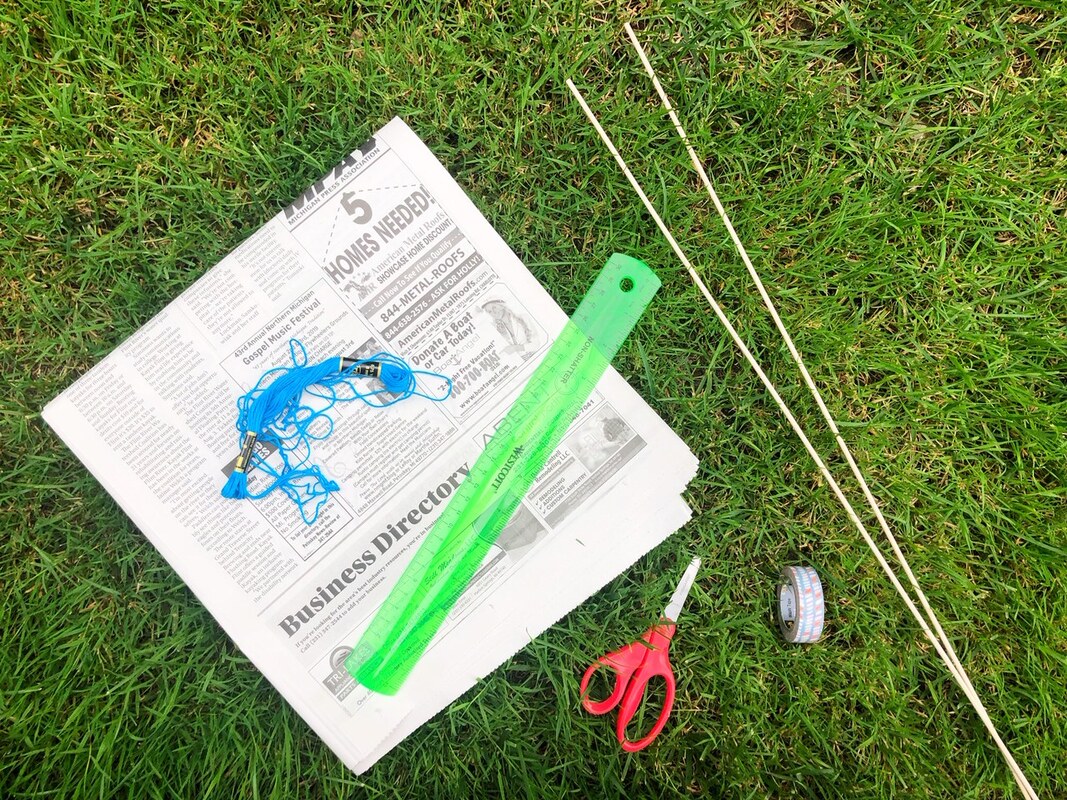
KITE SUPPLIES:
KITE SUPPLIES:
- Newspaper
- 2 x 1/8” dowels
- Colorful tape
- 2 Embroidery floss strands or strong string
- Scissors
- Ruler
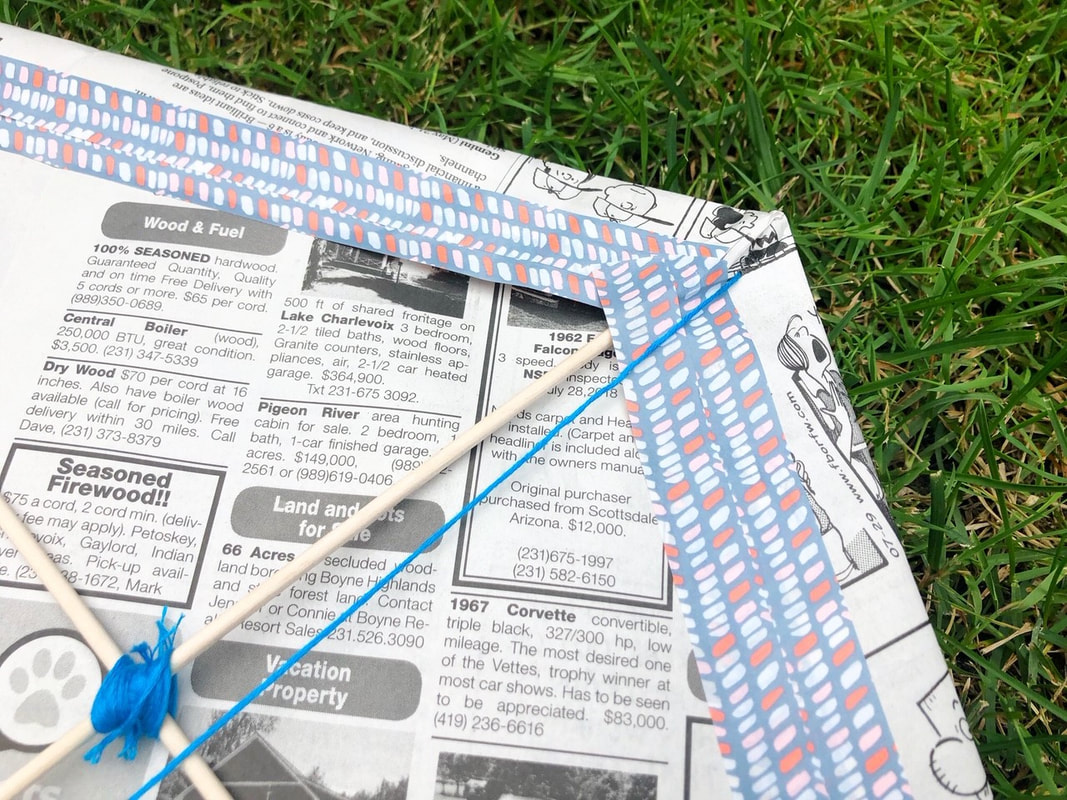
HOW TO MAKE A KITE STEP 1: Measure a 24” and 20” dowel and carefully cut with scissors. Then measure 6” down from the top of the 24” dowel and place the center of your 20” dowel across.
STEP 2.: Tie the center of the dowels together by weaving a piece of embroidery around each side and tie off into a knot.
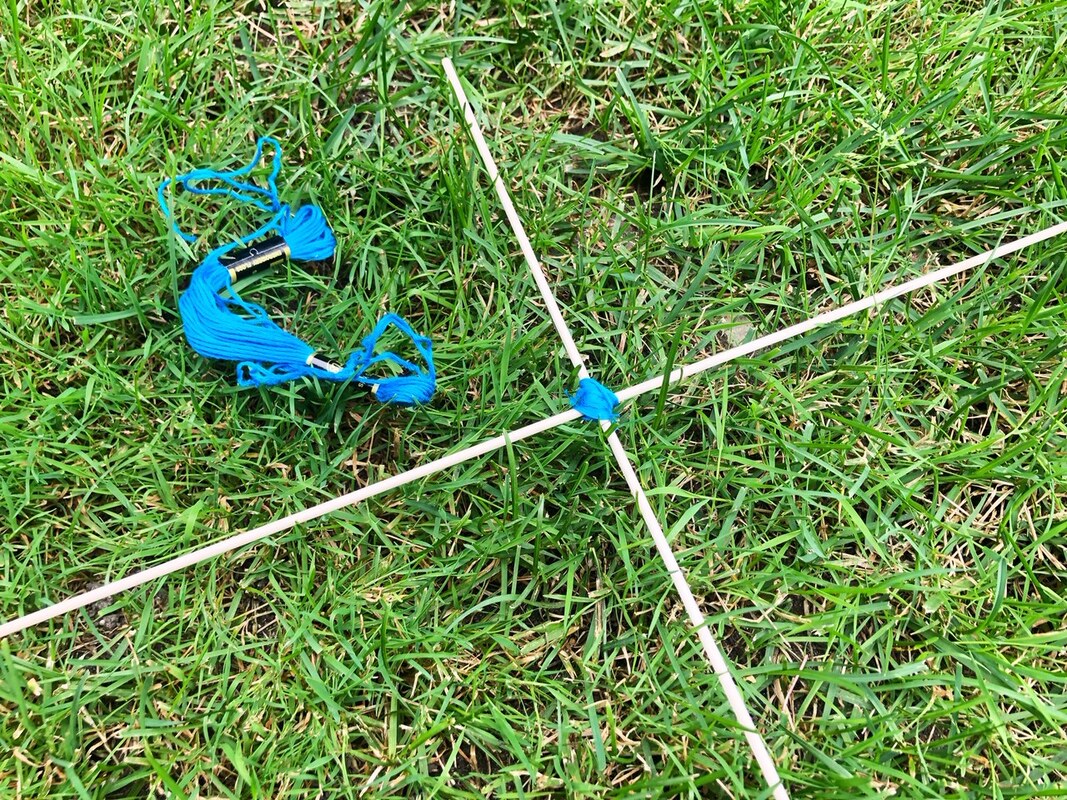
STEP 3. Carefully cut a notch into the ends of the dowels, wrap a piece of embroidery thread around the kite and tie into a knot. You can hold those in place with a dab on hot glue.
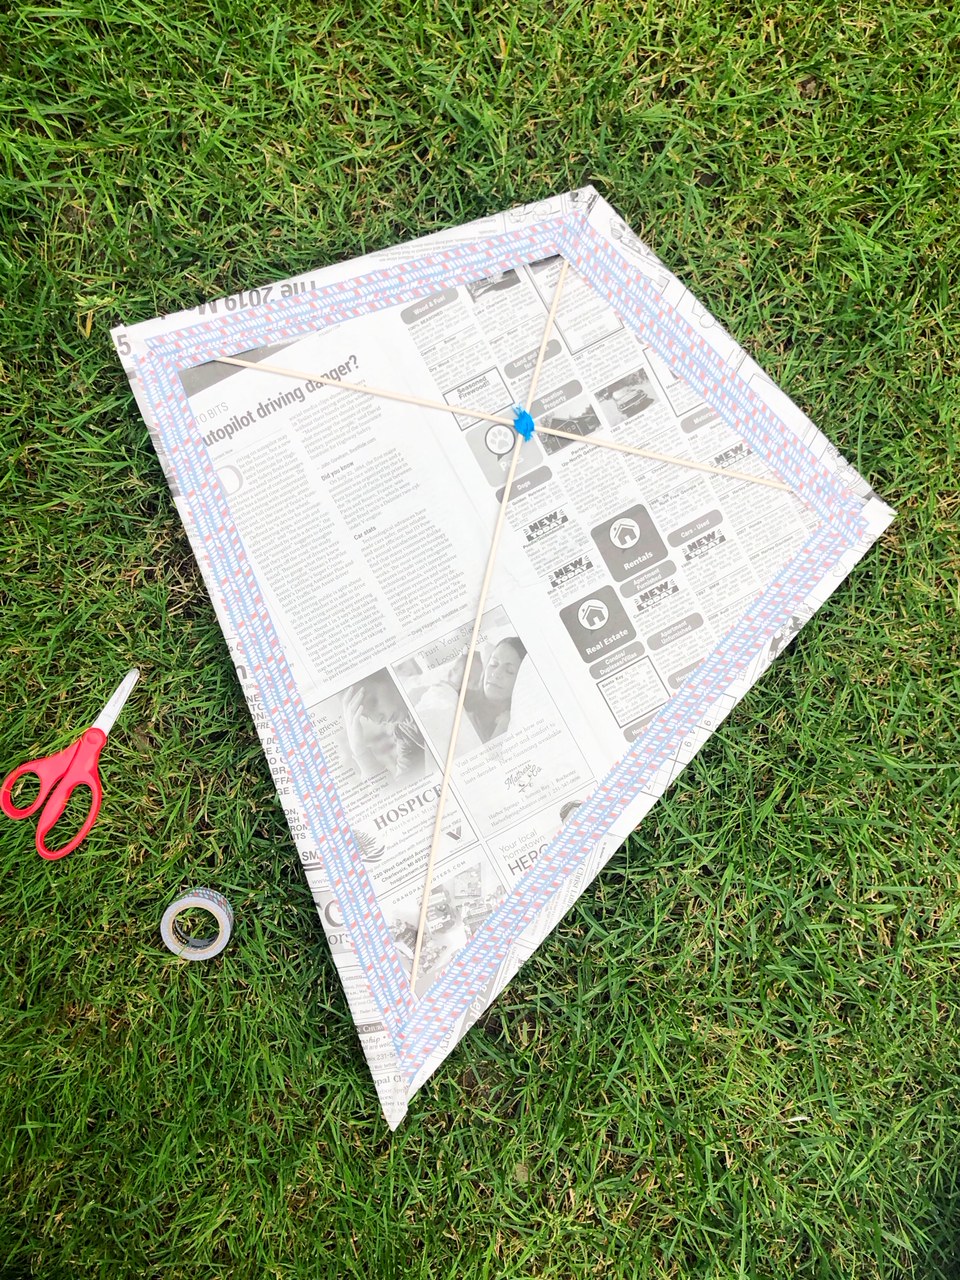
STEP 4. Lay the “t” shape onto a large piece of newspaper and cut an inch larger all the way around.
STEP 4. Lay the “t” shape onto a large piece of newspaper and cut an inch larger all the way around.
|
|
STEP 5. Fold each edge over the string around the kite and firmly tape the edges.
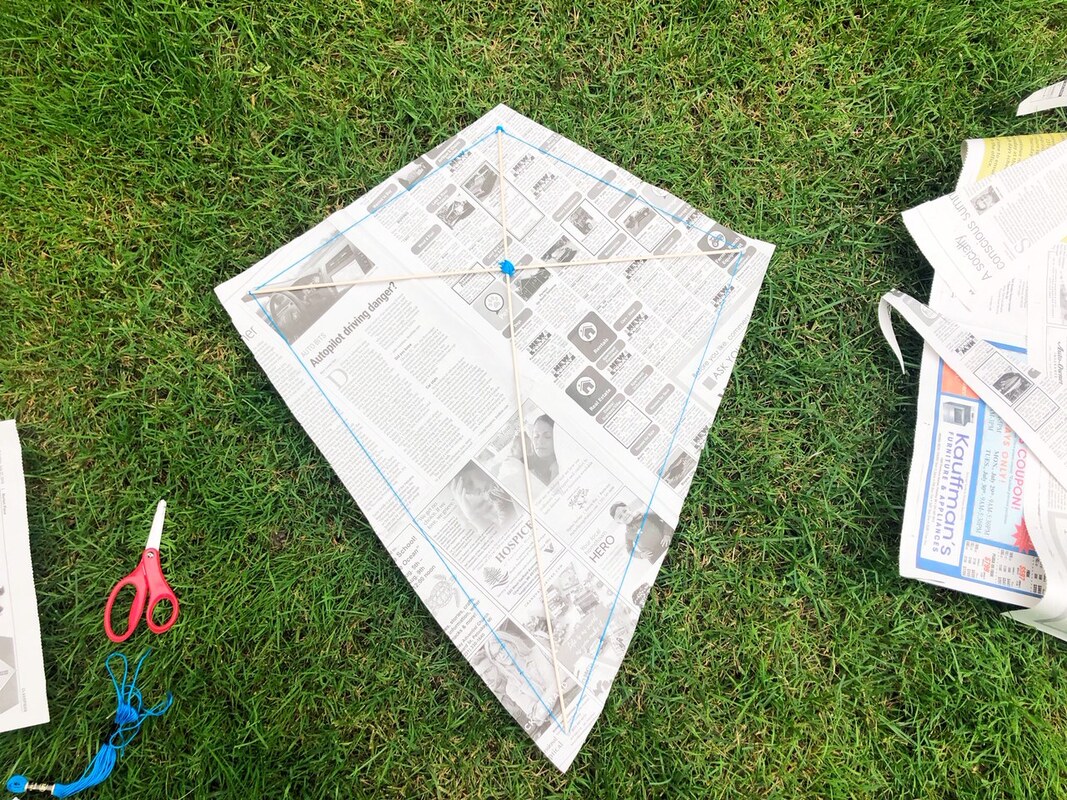
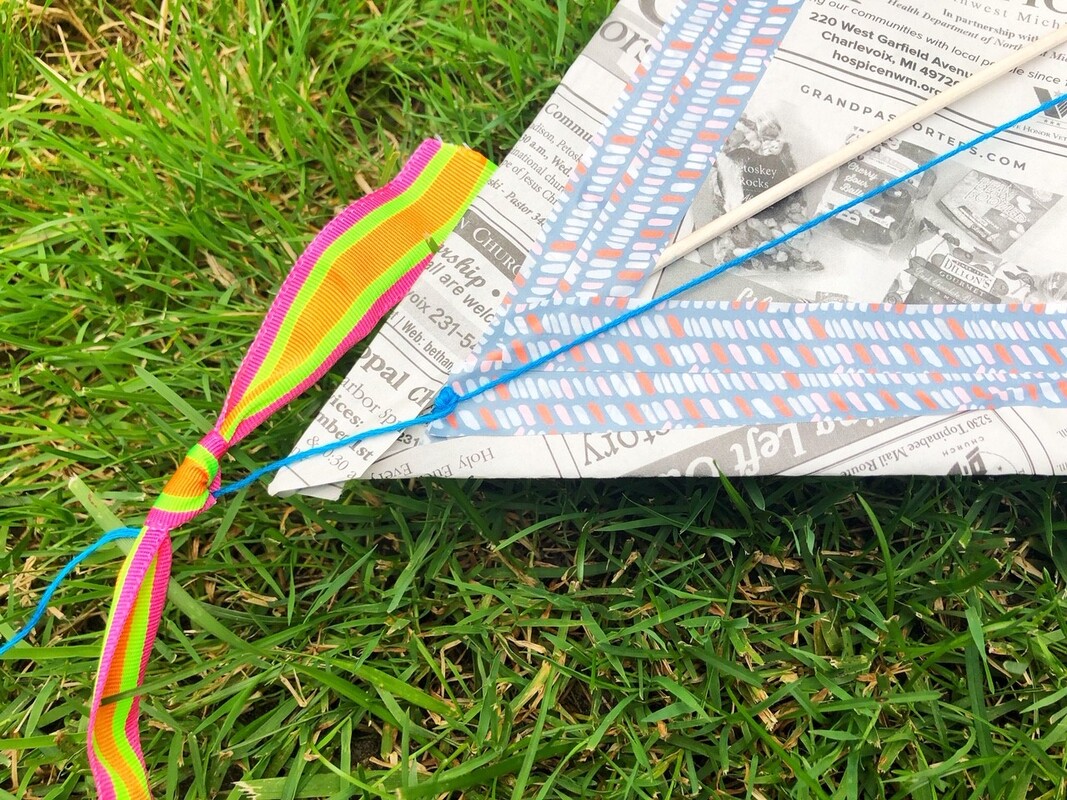
STEP 6. Poke a tiny hole at each point of the kite. Then starting at the top, place a piece of string through the top hole, tie a knot onto the back of the kite and tape. Place that same string through the bottom hole, tie a knot onto the back of the kite and tape.
STEP 6. Poke a tiny hole at each point of the kite. Then starting at the top, place a piece of string through the top hole, tie a knot onto the back of the kite and tape. Place that same string through the bottom hole, tie a knot onto the back of the kite and tape.
STEP 7. Let that string hang about 24” from the bottom and tie about 5 7” pieces around the string.
STEP 8. Repeat STEP 6 across the width of the kite.
STEP 8. Repeat STEP 6 across the width of the kite.
STEP 9. Use a piece of leftover dowel and wrap an entire strand of embroidery thread around it. Then tie the end to the center “t” of the strings and the dowel will be what you use to fly the kite

Week 6
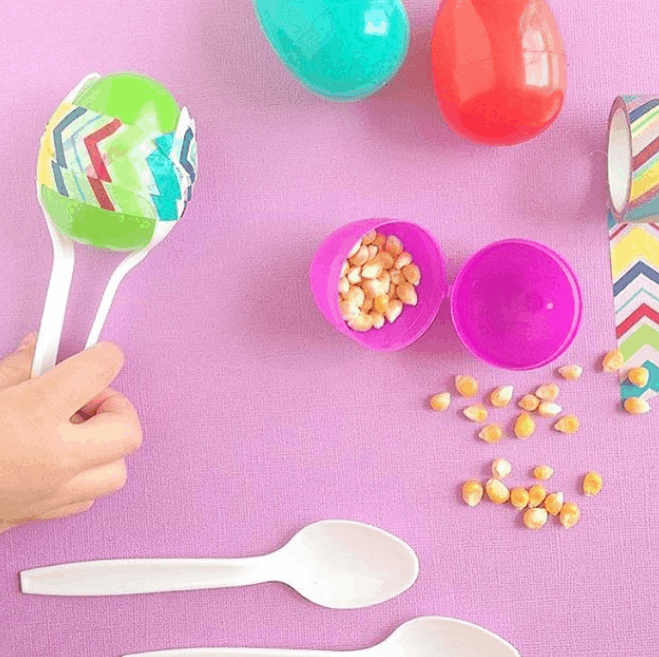
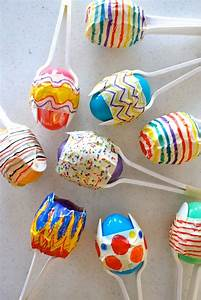
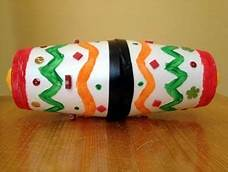
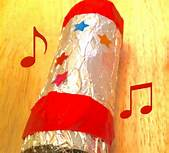
Hola Amigos! This week in celebration of Cinco de Mayo, we will make our very own maracas. We will use simple household items to create. I have included a list of suggested materials and pictures to get you started. Be sure to share your sweet music by uploading a picture of your maracas or you playing your maracas with family to our Facebook page with the hashtag #PVESTEAMMaracas.
WHAT YOU NEED FOR THIS DIY MARACAS CRAFT
- Plastic eggs (leftover Easter works perfect!)
- Plastic bottles
- Plastic spoons
- Tape
- Rice, beans, or popcorn kernels
|
|

|
¡Hola amigos! Esta semana en celebración del Cinco de Mayo, haremos nuestras propias maracas. Usaremos artículos domésticos simples para crear. He incluido una lista de materiales sugeridos e imágenes para comenzar. Asegúrese de compartir su dulce música subiendo una foto de sus maracas o tocando sus maracas con su familia en nuestra página de Facebook con el hashtag #PVESTEAMMaracas.
LO QUE NECESITAS PARA ESTA ARTESANÍA DIY MARACAS
LO QUE NECESITAS PARA ESTA ARTESANÍA DIY MARACAS
- Huevos de plástico (restos de Pascua funciona perfecto!)\
- Botellas de plástico
- Cucharas de plastico
- Cinta
- Arroz, frijoles o granos de palomitas de maíz
Week 5
|
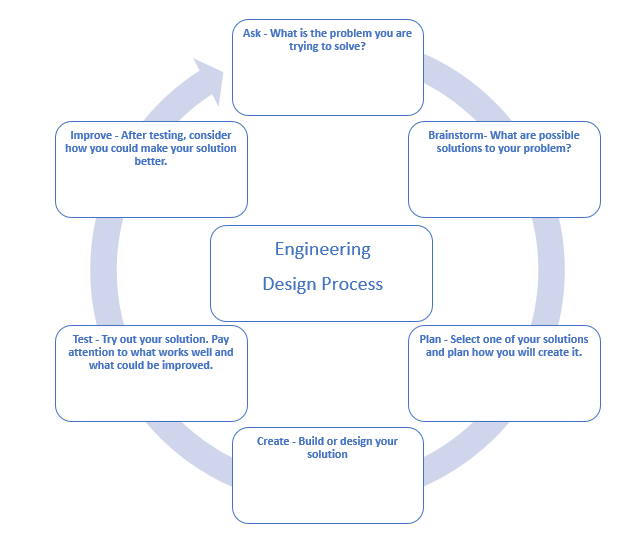
Design a Bird Feeder Challenge
Bird feeders allow people to study birds and provide food for birds when their source is limited. Your challenge is to design a bird feeder designed to feed and protect birds that are local to your community. Step 1: Select a bird that is native to Tennessee using the Tennessee Wildlife Resources Agency website. Step 2: Read about your selected bird's habitat, diet, and unique physical features. Step 3: Using the Engineering Design Process Guide, plan and create a bird feeder to feed your selected bird species. For the creation, use items you have around your house. Consider how you will attract the bird to your feeder, hold the feed, and keep other species from stealing the food. Step 4: Put fruit, seed, or anything else you may have in the feeder and set aside 30 minutes to observe the feeder. Did the birds come and feed? Why or why not? How could you improve your design to better attract and feed your bird species. Step 5: Ask your parent or teacher to share a picture of your bird feeder design on our school Facebook page using #PVESTEAMCHALLENGE and #PVEBirdFeeder! |
Diseña un desafío de comedero para pájaros
Los comederos para pájaros permiten a las personas estudiar pájaros y proporcionarles alimento cuando su fuente es limitada. Su desafío es diseñar un comedero para pájaros diseñado para alimentar y proteger a las aves locales de su comunidad. Paso 1: Seleccione un ave nativa de Tennessee utilizando el sitio web de la Agencia de Recursos de Vida Silvestre de Tennessee. Paso 2: Lea sobre el hábitat, la dieta y las características físicas únicas de su ave seleccionada. Paso 3: Utilizando la Guía de proceso de diseño de ingeniería, planifique y cree un comedero para pájaros para alimentar a las especies de aves seleccionadas. Para la creación, use elementos que tenga alrededor de su casa. Considere cómo atraerá al ave a su comedero, mantendrá el alimento y evitará que otras especies roben la comida. Paso 4: Ponga fruta, semillas o cualquier otra cosa que pueda tener en el alimentador y reserve 30 minutos para observar el alimentador. ¿Vinieron los pájaros y se alimentaron? ¿Por qué o por qué no? ¿Cómo podría mejorar su diseño para atraer y alimentar mejor a sus especies de aves? Paso 5: ¡Pídale a sus padres o maestros que compartan una imagen del diseño de su comedero para pájaros en las redes sociales usando #MakerMondayTN y #LearningInPlaceTN! |
Additional Resources:
Week 4
|
Design a Life jacket Challenge
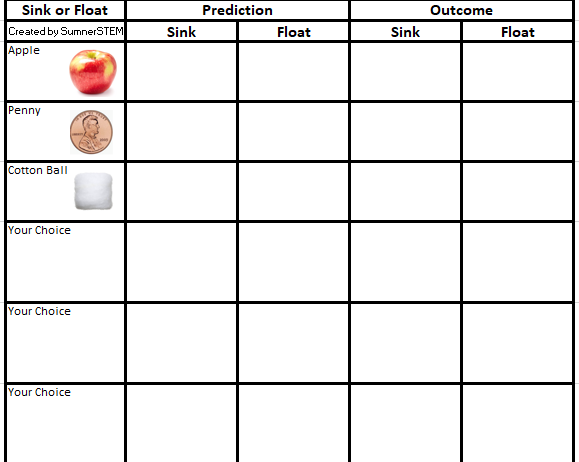
When building ships and submarines, engineers need to know the density of materials to make sure their structures float. Today, your challenge is to design a life-jacket to allow a common household object to float. Step 1: Test six household objects to determine which types of objects sink and float. Complete the Float or Sink Exploration document (pasted below). What do you notice about the objects that sank? What do you notice about the objects that floated? |
¡¡Este es tu Desafío!!
Diseña un chaleco salvavidas. Al construir barcos y submarinos, los ingenieros necesitan conocer la densidad de los materiales para asegurarse de que sus estructuras floten. Hoy, Tu desafío es diseñar un chaleco salvavidas para permitir que un objeto doméstico común flote. Paso 1: Prueba seis objetos domésticos para determinar qué tipos de objetos se hunden y flotan. Completa el documento de Exploración de flotador o sumidero (que está a continuación). ¿Qué notas sobre los objetos que se hundieron? ¿Qué notas sobre los objetos que flotaban? |
|
Step 2: Select one of the objects that sank. Step 3: Design a "life jacket" for the object that sank and see if you can keep it afloat. Use the Engineering Design Process Guide to map out your ideas and test and improve your idea. |
Paso 2: selecciona uno de los objetos que se hundieron.
Paso 3: Diseña un "chaleco salvavidas" para el objeto que se hundió y ve si puedes mantenerlo a flote. Use la Guía de proceso de diseño de ingeniería para trazar tus ideas, probar y mejorar tu idea. |
|
Step 4: Ask your parent to share a picture or video of your life jacket design on the PVE Facebook page using #PVESTEAMChallenge and #PVELifeJacket! |
Paso 4: ¡Pídeles a tus padres que tomen y compartan una foto o un video del diseño de tu chaleco salvavidas en la página de Facebook de PVE usando #PVESTEAMChallenge y #PVELifeJacket! |
Week 3
|
Hello again Panthers!
This week we are going to design and build egg drops. The goal is to build a structure that will protect your raw egg from breaking upon hitting the ground. Below is a list of suggested materials and a video that shows one way to construct an egg drop. Be creative in your design but also think what will protect my egg upon impact. When testing the egg drop be sure a parent holds the egg drop at the same height to ensure accurate testing. Share a picture of your egg drop on our school facebook page using the hashtag #PVEeggdropChallenge. Have fun and happy creating. |
Hola de nuevo Panteras!
Esta semana vamos a diseñar y construir gotas de huevo. El objetivo es construir una estructura que proteja su huevo crudo para que no se rompa al tocar el suelo. A continuación se muestra una lista de materiales sugeridos y un video que muestra una forma de construir una gota de huevo. Sea creativo en su diseño, pero también piense en lo que protegerá mi huevo en caso de impacto. Al probar la gota de huevo, asegúrese de que un padre sostenga la gota de huevo a la misma altura para garantizar una prueba precisa. Comparta una foto de su gota de huevo en la página de Facebook de nuestra escuela usando el hashtag #PVEeggdropChallenge. Diviértete y crea feliz. |
|
Suggested supplies are listed below, but feel free to be creative in what materials you make available. Scissors are the only tool they need.
Alternate or additional supply ideas: foil, grocery bags, plastic straws, toothpicks or shaving cream. Consider including small rocks that may provide weight to keep device parts in place. When choosing materials, remember no parachutes can be added to slow don your egg drop. |
Los suministros sugeridos se enumeran a continuación, pero no dude en ser creativo en los materiales que pone a disposición. Las tijeras son la única herramienta que necesitan.
Ideas de suministros alternativos o adicionales: papel de aluminio, bolsas de supermercado, pajitas de plástico, palillos de dientes o crema de afeitar. Considere incluir rocas pequeñas que puedan proporcionar peso para mantener las piezas del dispositivo en su lugar. Al elegir materiales, recuerde que no se pueden agregar paracaídas para reducir la caída de huevos. |
Share
Don't forget to take a picture to share. Have your parent share it to our Parkway Village Elementary-SCS Facebook page using the hashtags: #PVEEggDrop #PVESTEAMChallenge or send an email of your picture to [email protected].
Week 2
HELLO PVE Panthers!
This week we are going to have a family fun paper airplane STEAM challenge. Below you will find a few links to YouTube videos that can help you make different styles of paper planes. Then head outside with your family and test your planes. After testing, make needed improvements and begin the challenge. The person who makes the plane that flies the farthest is the winner. Happy Flying!
¡HOLA Panteras de PVE!
Esta semana vamos a tener diversión familiar haciendo un reto de un avión de papel STEAM (Ciencia, Tecnología, Ingeniera, Arte, y Matemáticas). Abajo encontrara algunos enlaces de videos de YouTube que te pueden ayudar hacer diferentes estilos de aviones de papel. Luego ve afuera con tu familia y prueba tu avión. Después de probarlo, has cambios si son necesarios y comienza el reto. La persona que haga que el avión vuele más lejos será el ganador. ¡Diviértete volando tu avión!
|
|
|
Share:
Don't forget to take a picture of your completed your paper airplane to share. Have your parent share it to our Parkway Village Elementary-SCS Facebook page using the hashtags: #PVEPaperAirplane #PVESTEAMChallenge or send an email of your picture to [email protected].
COMPARTE:
No te olvides de tomar fotos a tu avión de papel completo para compartir. Has que tus padres lo compartan en nuestra página web de Facebook – Parkway Village Elementary-SCS usando el hastags: #PVEPaperAirplane #PVESTEAMChallenge o envía un correo electrónico de tu fotografía a [email protected]
Week 1
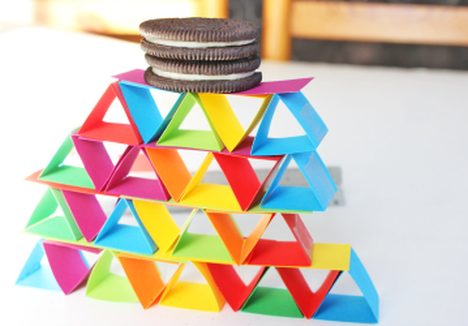
Hello STEAM Superstars! Are you ready for a challenge? This week, March 30 -April 3rd, you are making paper blocks and using them to create your own structure. It's important to start with a plan, be sure to draw your plan before you begin building. Once you have designed, created, and improved on your structure share it with the PVE family. Take a picture of your structure and have your parent share it to our Parkway Village Elementary-SCS Facebook page using the hashtags: #PVEPaperStructure #PVESTEAMChallenge or send an email of your picture to [email protected] and I will share the picture for you. Have fun and happy creating.
Materials
- Paper, construction paper, cardstock (thick is better, use color paper if you have it)
- scissors
- Tape or glue
- ruler or measuring tape
Instructions for Creating Building Blocks
- Hold paper vertically and cut paper into 1" strips (as many as you need)
- Then take strips and shorten them to 3" strips for triangle shaped bricks and 4" strips for square shaped bricks.
- Then fold strips to make bricks. Two folds 1" apart for triangles and three folds 1" apart for square bricks. (See pictures)
4. Use a small piece of tape or glue to close blocks. (See pictures)
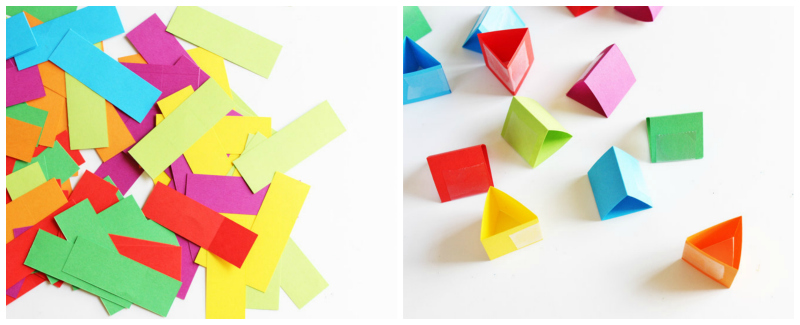
5. Hold new sheet of paper vertically and cut 1" strips into 3" or 6" pieces to make planks for building (cut as many as you need)
Draw Your Plan:
Take a moment to think about how you will use the planks and bricks to build your structure. Draw a picture of your design idea for your structure.
Create your structure:
You are now ready to create your structure. Use your plan to build and stick to your plan. You will get a chance to make improvements.
Improve you design:
Now is time to make improvements to your design and structure.
Share:
Don't forget to take a picture of your completed structure to share. Have your parent share it to our Parkway Village Elementary-SCS Facebook page using the hashtags: #PVEPaperStructure #PVESTEAMChallenge or send an email of your picture to [email protected].
Challenge:
I challenge you to test your structure's weight limits. Can you add weight to your structure without it falling over? Start small and see how much weight you can add, then improve your design to add more weight.

Check back next week for more challenges to complete...
