Week 6
This week we are going to take a look at some Mexican Artists and some traditional Mexican folk art to Celebrate Cinco de Mayo (May 5th).
5 Mexican Artists You Should Know
Folk Art - Folk art is a work that usually has a function instead of just being decorative like a painting or a sculpture. Most folk art is done by artist who have not had “formal” training like going to college, and instead the craft has been taught to them by a family member who also learned from a family member. Examples of Folk Art are quilting, weaving, pottery, furniture, jewelry, embroidery, and doll making.
Supplies:
Place a large round object on top of a large piece of colorful paper and trace around it to create a large circle on your paper. Carefully cut out the paper so you have a circular piece of paper.
Use a smaller round object on a piece of cardboard and trace around it to create a small circle. Carefully cut it out so you have a small cardboard circle.
Tear off a piece of aluminum foil that is big enough to cover the whole small cardboard circle. Spread glue over the circle and glue on the foil, shiniest side up. Cut off any really big pieces of aluminum foil that overhang the circle, and fold the rest over on the underside.
Glue the foil covered circle in the center of the large piece of papers.
While that dries, use markers or crayons to create patterns around the outside of the foil “mirror.”
Use the dull pencil or pen to carefully create more patterns on the foil. Press gently or the foil can tear.
5 Mexican Artists You Should Know
- Frida Kahlo (1907 - 1954) - Probably the most known Mexican artist of all time, Frida was a painter who during her short life left more than 150 surviving works of art. She is most known for her self portraits which are colorful and rich with symbolism about her her own tragic life, the political events of Mexico, gender, race, and identity.
- Diego Rivera (1886 - 1957) - Trained in both Mexico and France, Rivera was a muralist whose work can be seen across Mexico and the United States. Muralists are artists who create large artworks in public spaces to be seen and enjoyed by people without having to go to museums.
- Sebastián (1947 - Present) - So famous he only needs one name, Sebastián is a sculptor who works with metal and concrete to create enormous abstract sculptures that can be seen in Mexico and as far away as Japan.
- José Guadalupe Posada (1852 - 1913) - An influence to numerous artists and cartoonists to come, Posada was a very influential political printmaker and engraver who published thousands of illustrations during his career.
- Betsabee Romero (1963 - Present) - Printmaking, photography, video, and sculpture are all artforms that Romero is familiar with and uses in combination with traditional Mexican imagery to create her installation art that covers subjects such as colonialism and global consumption of goods. Installation art is art that is created for a specific location, transforming that space into an interactive environment.
Folk Art - Folk art is a work that usually has a function instead of just being decorative like a painting or a sculpture. Most folk art is done by artist who have not had “formal” training like going to college, and instead the craft has been taught to them by a family member who also learned from a family member. Examples of Folk Art are quilting, weaving, pottery, furniture, jewelry, embroidery, and doll making.
Supplies:
- Paper (any color, or some of the printed papers you have already created)
- Pencil
- Scissors
- Markers or Crayons
- Glue
- Cardboard (an empty cereal box would be perfect)
- Aluminum Foil
- Two sizes of round objects (like plates or bowls)
- A dull pencil or a pen
Place a large round object on top of a large piece of colorful paper and trace around it to create a large circle on your paper. Carefully cut out the paper so you have a circular piece of paper.
Use a smaller round object on a piece of cardboard and trace around it to create a small circle. Carefully cut it out so you have a small cardboard circle.
Tear off a piece of aluminum foil that is big enough to cover the whole small cardboard circle. Spread glue over the circle and glue on the foil, shiniest side up. Cut off any really big pieces of aluminum foil that overhang the circle, and fold the rest over on the underside.
Glue the foil covered circle in the center of the large piece of papers.
While that dries, use markers or crayons to create patterns around the outside of the foil “mirror.”
Use the dull pencil or pen to carefully create more patterns on the foil. Press gently or the foil can tear.
Week 5
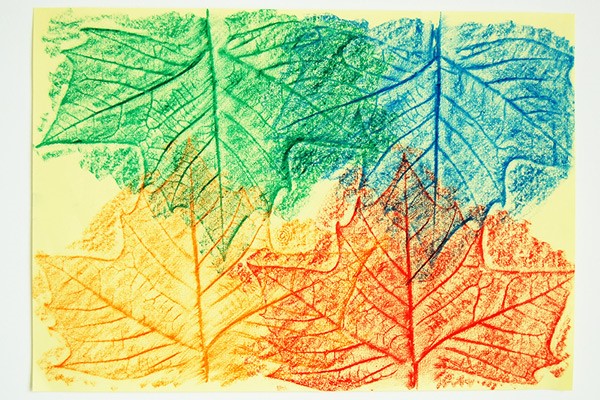
Welcome back PVE Family! This week we are going to do some printmaking with some things you probably already have around the house. Printmaking is a process artists use to recreate art work multiple times allowing them to sell the same image to multiple people. This is a process that has been used for hundreds of years using lots of different materials.
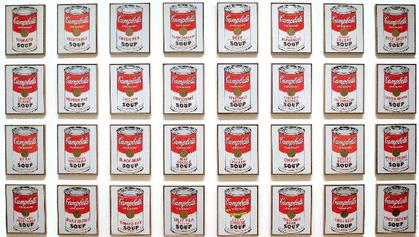
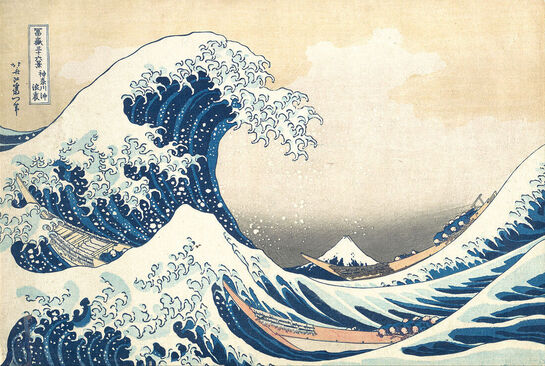
Many of you might recognize a very famous print called "The Great Wave off Kanagawa" by Katsushika Hokusai in 1829, almost 100 years ago. It was made by carving blocks of wood with an image and printing it on rice paper. This is an image that many artists have incorporated into other works of art through today. Andy Warhol was a famous Pop artist in the 1960's who made silk screen prints, a method that is still used today to make things like posters and t-shirts. He famously made images of celebrities at the time like Marilyn Monroe and popular products like Campbell's soup cans. Today you are going to make your own prints, so let's look at what we need for the process. Supplies:
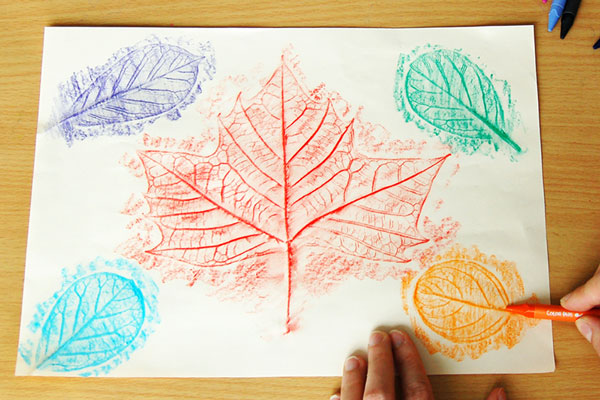
1. Use the scissors to cut flat pieces of the Styrofoam container, this will be your printing plate. You can leave the pieces big, or cut them into smaller pieces to make several printing plates. 2. With your pen or dull pencil, draw your picture onto the printing plate. Be sure to feel the printing plate before moving onto printing to make sure you can feel the texture of the design in the Styrofoam to make sure your image is clear when you print. If you are using words, be sure to write them backwards so they are the right way when printed. 3. Color the entire printing plate with marker. Experiment with using multiple colors to make a multicolored print. Lightly spray your paper with the spray bottle and then put your printing plate marker side down on the paper. Allow it to sit there for a few seconds, gently rubbing the back of the printing plate to help transfer the marker to the paper. 4.Lift the printing plate off of the paper to reveal your print! |
|
Week 4
This week we're going to explore Google Arts & Culture! You can access this on a computer here or on a phone or tablet with the Google Arts & Culture app.
Clicking on Explore allows you to search for artwork in a lot of different ways. You can look at art by the colors it has, the places they were made, the subject of the paintings, and even historical events they depict.
Nearby shows you all the great places around us that we can look at art. Although a lot of these places are currently closed, some of them have digital galleries so you can look at examples of their artwork right from the computer, tablet, or phone.
I can't wait to see all the different art and activities you can find on the app to learn more about the art world, there is definitely art for everyone out there!
While you're exploring, don't forget to take an Art Selfie! The app will take your picture and match you to artwork in their database to see what image you most closely resemble. Be sure to post your art selfies on your social media and tag PVE so we can see all your great smiles!
Week 3
Bubble Prints
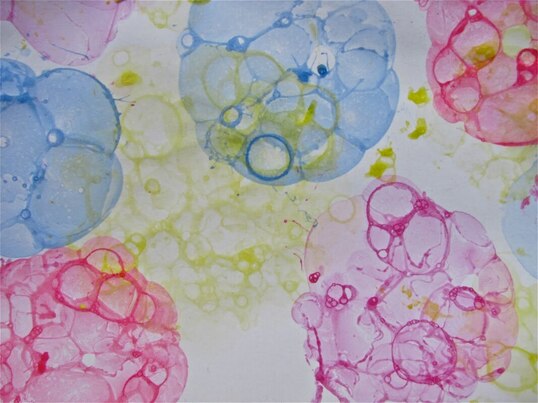
Supplies: Water Dish Soap Food Coloring Straw Cups or Bowls Paper This week we are going to make bubble prints! A print is a type of artwork we find in Printmaking, an art process where artist can make multiple identical copies of their work quickly. Your bubble prints won't all be identical in this process, but you can make lots of them very quickly using different colors. Fill your cup or bowl about half way with water and add a small amount of dish soap and a few drops of one color of food coloring to each. Use the straw to blow into the water creating enough bubbles that it fills up the bowl over the top rim. Put your paper down on top of the bowl to cover the surface of the bubbles. They will pop and transfer the color on to your paper. |
Week 2
Salt Dough Recipe
Ingredients 1/2 cup Flour 1/4 cup Salt 1/4 cup Water Method Mix together until dough forms. Experiment with different ways to create objects out of your salt dough. Can you make something you see every day in your house? Can you make an animal? Once you form your clay, you can leave it to dry in a warm, dry place or have an adult help you bake it in the oven at 250 degrees for 2 hours. You can add color to your clay before you form it by adding a drop of food coloring and mixing it up, or after its dry with markers or paint. Leftover dough should be kept in a zip top bag or wrapped in plastic wrap in the fridge. It should last about a week. Receta de masa de sal Ingredientes Una taza ½ de harina Una taza ¼ de sal Una taza ¼ de agua Método Mezclarlo junto hasta que la masa se pueda formar. Experimentar diferentes maneras de crear objetos con la masa de sal. ¿Puedes hacer algo que ves todos los días en tu casa? ¿Puedes hacer un animal? Una vez que formes tu arcilla, la puedes dejar que se seque en un lugar caliente, y seco o un adulto puede ayudarte a hornearla en el horneador a 250 grados por dos horas. Puedes añadirle color a tu arcilla antes de formarla añadiéndole una gota de colorante alimenticio y mezclarlo, o después que se seque colorearlo con marcadores o pintura. Lo que te sobre de la arcilla puede ser guardada en una bolsa o envolverlo en una plástico y ponerlo en la refrigeradora. Debería durar hasta una semana. |
|
Share
Don't forget to take a picture of you completing your art work. Have your parent share it to our Parkway Village Elementary-SCS Facebook page using the hashtags: #PVEArtChallenge #PVESaltdough or send an email of your picture to [email protected]
Virtual Museum Tours |
Resources to keep you busy making art during our time away: |
Week 1 Activity - Leaf Texture Rubbings
You Will Need:
- Crayons
- Paper
- Leaves
Use your time outdoors to look for leaves of different sizes and shapes. Place leaves on a flat surface like a table or the sidewalk and use crayons to color over the top to capture the texture of the leaves. Try overlapping the different leaves and using different colors to create a layered image.
Share:
Don't forget to take a picture of you completing your art work. Have your parent share it to our Parkway Village Elementary-SCS Facebook page using the hashtags: #PVEArtChallenge #PVELeafTextureRubbings or send an email of your picture to [email protected]